صفحه 3 از 3 نخستنخست 123
نمایش نتایج: از شماره 21 تا 30 , از مجموع 30

موضوع: Astrophotography Complete Guide

  1. Top | #1
    کاربر ممتاز

    عنوان کاربر
    کاربر ممتاز
    تاریخ عضویت
    Feb 2011
    شماره عضویت
    584
    نوشته ها
    1,588
    تشکر
    20,144
    تشکر شده 12,837 بار در 1,573 ارسال

          Astrophotography Complete Guide

    Hello My dear Friends,

    Astrophotography is one of the most beautiful & enjoyable activities in Astronomy (most in
    Amateur astronomy) and there are many astronomers who like it & work on it.

    In this topic, we put some good & useful points about this subject from good resources like Sky at night magazine, Cloudy nights & ...

    So be with us & share your comments here


    *With special thanks to
    all those who have contributed their knowledge, hardware tips and softwares in the internet

    *********************************************
    How to take nightscapes
    How to image the moon
    How to image the planets
    Imaging the Sun
    Something about your camera
    Introducing deep-sky photography


    ویرایش توسط stargazer : 04-11-2012 در ساعت 09:56 PM


  2. Top | #21
    کاربر ممتاز

    عنوان کاربر
    کاربر ممتاز
    تاریخ عضویت
    Nov 2011
    شماره عضویت
    2166
    نوشته ها
    632
    تشکر
    8,638
    تشکر شده 7,688 بار در 659 ارسال


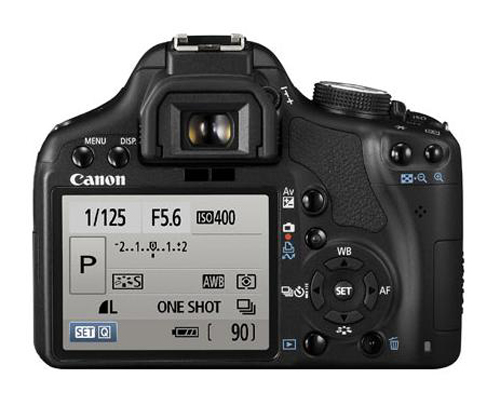
    Most cameras also have a way to change their "sensitivity". This is kind of a trick setting though. You can't really change the sensitivity of the sensor in the camera, but you can adjust a setting called the ISO, which is sort of like a multiplier factor. ISOs may run from 100 to 400 in simple cameras, or up to 800, 1600 or 3200 in more expensive cameras. The higher the ISO number, the brighter the resulting image will be. Unfortunately, the noise, or grain, gets worse at the higher ISOs, but we won't worry about that for now.

    To get started, you will have to figure out how to get your camera to use as long a shutter speed as possible, at as wide an aperture as possible, and at as high an ISO as possible. Unfortunately, you may have to read the manual to learn how to do this. Sorry. Your other option is to just dig around in the camera's menus looking for these settings, but sometimes they can be hard to find and not labeled very clearly.

    Set the camera on manual exposure if it has that setting. Then set the lens to its widest opening, usually f/2.8. Set the ISO to the highest it will go, usually 400 for simple point and shoot cameras. If the camera doesn't have a manual exposure setting, set it to night mode.

    ..... to be continued
    ویرایش توسط stargazer : 03-27-2012 در ساعت 11:10 PM

  3. 4 کاربر مقابل از رخساره روشنی عزیز به خاطر این پست مفید تشکر کرده اند.


  4. Top | #22
    کاربر ممتاز

    عنوان کاربر
    کاربر ممتاز
    تاریخ عضویت
    Nov 2011
    شماره عضویت
    2166
    نوشته ها
    632
    تشکر
    8,638
    تشکر شده 7,688 بار در 659 ارسال


    Focus

    The next thing you will have to worry about is the focus. Once again, dig through the camera manual, or menus, and see if you can figure out how to turn off the autofocus, and manually focus the camera on infinity (the farthest away that the camera will focus).


    For more sophisticated digital cameras like DSLRs, you can pre-focus the camera in the daytime on something very far away, and then turn the auto-focus off. If you have a DSLR with a lens that you can manually focus, focus it on infinity and tape it down. Beware, many of these lenses actually will go past infinity, so you can't just trust the markings on the lens.

    Experiment with this in the daytime. If you have a point and shoot camera, it may have a setting for shooting at infinity and may have some type of icon of mountains to indicate this. Try shooting something very far away to be sure the setting works.


    White Balance

    Light-polluted red sky with auto white balance.

    Many cameras also allow the white balance to be selected by the user. Once again, this setting will be buried in a menu somewhere.


    Most will be set to auto white balance by default. This usually doesn't give great results for nighttime photography, especially if you are shooting anywhere that has light pollution. This will usually make the sky a brown/red color. Try setting the white balance to Tungsten for long exposures of the night sky. This can give a more pleasing sky background.

  5. 2 کاربر مقابل از رخساره روشنی عزیز به خاطر این پست مفید تشکر کرده اند.


  6. Top | #23
    کاربر ممتاز

    عنوان کاربر
    کاربر ممتاز
    تاریخ عضویت
    Feb 2011
    شماره عضویت
    584
    نوشته ها
    1,588
    تشکر
    20,144
    تشکر شده 12,837 بار در 1,573 ارسال

    Introducing deep-sky photography

    from: sky at night

    Astrophotography Complete Guide-ap5_main-jpg


    Imaging deep-sky objects, like the globular cluster M13, captures the beauty of distant space


    Deep-sky astrophotography produces some of the most spectacular images in astronomy. It’s immensely rewarding, but is also perhaps the most demanding of all the subjects covered in this series. Capturing and processing your images presents a whole new set of challenges for both you and your equipment as the requirements are very different from the subjects we’ve covered in the previous four parts of this guide. Here we’ll show you the best way to set up your gear, capture the data and process it to create your own deep-sky images.

    to be continued ...

    ویرایش توسط stargazer : 06-19-2012 در ساعت 11:26 AM
    امضای ایشان
    برگ در انتهاي زوال مي افتد و ميوه در ابتداي کمال … بنگر که چگونه مي افتي ؟!

  7. 3 کاربر مقابل از stargazer عزیز به خاطر این پست مفید تشکر کرده اند.


  8. Top | #24
    کاربر ممتاز

    عنوان کاربر
    کاربر ممتاز
    تاریخ عضویت
    Feb 2011
    شماره عضویت
    584
    نوشته ها
    1,588
    تشکر
    20,144
    تشکر شده 12,837 بار در 1,573 ارسال

    MASTERCLASS

    Capture the globular cluster M13

    Here we’ll show you how to capture an image of the popular globular cluster, M13, in the constellation of Hercules. You can use a one-shot colour CCD or a DSLR camera for this object.

    Focus your camera on mag. +2.8 Zeta (ζ) Herculis, the star at the bottom right of the Keystone asterism in the centre of Hercules.

    Remember to remove your Bahtinov mask if you used one and slew up towards mag. +3.5 star Eta (η) Herculis at the top right-hand corner of the Keystone asterism. M13 is to be found two-thirds of the way between the two stars.

    The cluster’s apparent diameter is 20 arcseconds, so a focal length of 650-1,200mm would be ideal – well within reach of many popular reflectors and refractors.

    A smaller focal length may not work as well, as globular clusters lose their visual impact if the field of view is too wide.

    Framing isn’t too critical for this circular object but you might wish to include the two contrasting colour stars in your image – blue to the south and reddish to the east – or even the magnitude +11.6 galaxy, NGC 6207 to the northeast.

    M13 is fairly bright at mag. +5.9 but it has a bright core soyou’ll need to be careful not to overexpose it and burn out the centre.

    Exposures in the region of 60 seconds at an ISO of between 800 and 1600 for a DSLR camera, or 120-150 seconds with a one-shot colour CCD camera, should capture some good detail.

    Take at least 10 images but preferably more – up to about 30 – at these settings, using RAW mode on your DSLR camera or unbinned if you are using a CCD camera.

    You can automate the process with the software that controls your CCD camera but if you are using your DSLR camera without a laptop, a programmable remote shutter release (readily available from camera stores) will do this for you.

    If you are manually operating your DSLR camera be sure to use a remote shutter release, as a minimum, to avoid camera shake. Complete the session by taking 16-20 dark frames, bias frames and if possible, flat frames.

    Using suitable software such as MaximDL or Deep Sky Stacker, you should now calibrate and stack your images.

    Deep Sky Stacker will import your light, dark, bias and flat frames and automatically carry out the various processing tasks for you to give a calibrated, de-Bayered (to generate the colour channels captured by the Bayer filter) and stacked image ready for importing into a photo-editing program like Photoshop or GIMP.

    MaximDL, on the other hand, will break the process down into modules. The first operation stacks the calibration frames into master frames. These masters will then be applied to each of your light frames. Save the result in a new folder if you wish.

    Stack the calibrated light frames to produce a final FITS-format file, then save a copy in TIFF format for final processing in Photoshop or GIMP.

    to be continued ...
    امضای ایشان
    برگ در انتهاي زوال مي افتد و ميوه در ابتداي کمال … بنگر که چگونه مي افتي ؟!

  9. 3 کاربر مقابل از stargazer عزیز به خاطر این پست مفید تشکر کرده اند.


  10. Top | #25
    کاربر ممتاز

    عنوان کاربر
    کاربر ممتاز
    تاریخ عضویت
    Feb 2011
    شماره عضویت
    584
    نوشته ها
    1,588
    تشکر
    20,144
    تشکر شده 12,837 بار در 1,573 ارسال

    STEP BY STEP

    Imaging the globular cluster M13

    1Polar alignment

    To ensure that your mount tracks the sky as accurately as possible and to help your Go-To system to locate objects first time, make sure that you carry out an accurate polar alignment. Using a polarscope is quick and easy, so don’t compromise as it will be a little time well spent.

    2Getting balanced

    Your mount will work most efficiently if you limit the amount of load it has to move. Getting an accurate balance will go a long way to achieving this. Balance the dec axis first with all of your equipment installed and the camera at approximate focus, then balance the RA axis.

    3Slew to Zeta Herculis and focus

    Align on a bright star near Hercules, attach your Bahtinov mask and adjust focus until the cross is bisected by the line. Remove the mask and slew to Zeta Herculis, centering it on your camera’s sensor. If your mount has the facility, synchronise on this star and slew to M13.

    4 Capture your light and calibration frames

    Start your imaging run, aiming for as many images as possible. Unless you already have a library of bias and dark frames (at the correct exposure length), leave time for these. Flat frames must be taken on the night or the next day without touching the camera or focus.

    5Calibrate, de-Bayer and stack

    Using your stacking software, apply your calibration frames to your image data to remove unwanted artefacts. Unless your software does this automatically, de-Bayer your calibrated frames and stack them using the ‘SD Mask’ or ‘Kappa Sigma’ option.

    6Post-processing

    You should already be seeing a reasonable image now but this is just the starting point. Export your image as a TIFF file (preferably 16-bit) and load it into either GIMP (8-bit images only) or
    Photoshop (16-bit). Start by applying a gentle ‘Levels’ adjustment to release detail in your image

    to be continued...
    امضای ایشان
    برگ در انتهاي زوال مي افتد و ميوه در ابتداي کمال … بنگر که چگونه مي افتي ؟!

  11. 2 کاربر مقابل از stargazer عزیز به خاطر این پست مفید تشکر کرده اند.


  12. Top | #26
    کاربر ممتاز

    عنوان کاربر
    کاربر ممتاز
    تاریخ عضویت
    Feb 2011
    شماره عضویت
    584
    نوشته ها
    1,588
    تشکر
    20,144
    تشکر شده 12,837 بار در 1,573 ارسال

    NEED TO KNOW

    Camera control software

    DSLR

    If your camera software allows you to take exposures of a minute or more, use it to set the ISO value to 1600, white balance to auto, file format to RAW, noise reduction (if available) to off and shutter speed to 60 seconds.

    If not, set these values manually, then set the shutter speed to ‘bulb’and use a manual or programmable remote shutter-release cable to trip the shutter for a 60-second exposure.

    There’s no aperture setting because telescopes don’t have a variable iris. If your software doesn’t allow a ‘live view’ image on your laptop, take a series of 10-second exposures using a Bahtinov mask and adjust the focus in between shots.

    CCD camera

    CCD cameras need software to control them. Programs such as MaximDL and Nebulosity will do this.

    Some CCD cameras have a gain control but use with caution to avoid increasing noise levels from the camera’s sensor.

    Set exposure length to between 100 and 120 seconds for the imaging run but for focusing on a bright star, 6-second exposures with 2x2 binning will suffice.

    Unlike a DSLR camera, there’s no image processing built in, so images are automatically taken in a RAW state. If you have set-point cooling, set it to -25º and set the binning mode to 1x1.

    امضای ایشان
    برگ در انتهاي زوال مي افتد و ميوه در ابتداي کمال … بنگر که چگونه مي افتي ؟!

  13. 4 کاربر مقابل از stargazer عزیز به خاطر این پست مفید تشکر کرده اند.


  14. Top | #27
    کاربر ممتاز

    عنوان کاربر
    کاربر ممتاز
    تاریخ عضویت
    Feb 2011
    شماره عضویت
    584
    نوشته ها
    1,588
    تشکر
    20,144
    تشکر شده 12,837 بار در 1,573 ارسال

    Advanced deep-sky photography

    from: Sky at night


    Capturing an image of The Wall in LRGB produces striking colours and sharp contrasts


    In part six of our guide to astrophotography, we’ll be taking deep-sky imaging to the next level

    In part five, we looked at producing deep-sky images with DSLR cameras and one-shot colour CCD cameras

    This time we’ll be concentrating on deep-sky imaging with mono cameras and external filters

    These don’t rely on built-in colour filters to encode the colour data, as well as having increased sensitivity, enabling you to produce sharp, exquisitely detailed deep-sky images

    to be continued...
    امضای ایشان
    برگ در انتهاي زوال مي افتد و ميوه در ابتداي کمال … بنگر که چگونه مي افتي ؟!

  15. 2 کاربر مقابل از stargazer عزیز به خاطر این پست مفید تشکر کرده اند.


  16. Top | #28
    کاربر ممتاز

    عنوان کاربر
    کاربر ممتاز
    تاریخ عضویت
    Feb 2011
    شماره عضویت
    584
    نوشته ها
    1,588
    تشکر
    20,144
    تشکر شده 12,837 بار در 1,573 ارسال

    MASTERCLASS

    Imaging The Wall, the brightest part of NGC 7000, using LRGB filters

    Here we’re going to show you how to produce a full colour image using LRGB filters and a mono CCD camera.

    A mono CCD camera is a very versatile piece of equipment;it lets you capture data using a wide range of filters to achieve different results.

    Add to this the ability to take long exposures with reduced electronic noise, thanks to these cameras’ in-built Peltier cooling, and it becomes a very powerful tool.

    Your choice of filter size will be dictated by the size of your sensor as well as your pocket. Although it is possible to remove the camera and replace each filter in turn, this is really not recommended!

    It becomes a tortuous task to make sure that everything goes back in place correctly to ensure that the individual groups of images line up with one another, so a filter wheel is a real must-have.

    Although a software-controlled electronic wheel is very nice, a manual wheel removes a level of complexity from the system and is pretty much guaranteed to have repeatability of filter placement each time.

    Despite ranges of good-quality filters being designed to be parfocal, wise astrophotographers will always check focus when swapping to the next filter so unless you have completely automated focus as well, the appeal of an electronic filter wheel diminishes further.

    to be continued ...
    امضای ایشان
    برگ در انتهاي زوال مي افتد و ميوه در ابتداي کمال … بنگر که چگونه مي افتي ؟!

  17. 3 کاربر مقابل از stargazer عزیز به خاطر این پست مفید تشکر کرده اند.


  18. Top | #29
    کاربر ممتاز

    عنوان کاربر
    کاربر ممتاز
    تاریخ عضویت
    Feb 2011
    شماره عضویت
    584
    نوشته ها
    1,588
    تشکر
    20,144
    تشکر شده 12,837 بار در 1,573 ارسال

    However, electronic wheels do have one great advantage over their manual siblings: once the filters are loaded in they are light- and dust-tight because there is no wheel edge projecting out of the casing for you to manually revolve.

    It is useful to plan an imaging run carefully in advance to make sure that you make the best of your available time.

    In LRGB imaging, your luminance data is the most important as this decides the deepness and detail features of your image, but how you capture your RGB data can have a great effect on the final image too.

    What you’re trying to achieve in RGB imaging is a finished picture that replicates the colours seen by the human eye through matching the spectral sensitivity of the CCD’s sensor to your eye.

    The human eye is most sensitive to green light whereas a CCD sensor normally has its highest sensitivity in red light, which is great for imaging emission nebulae.

    However, the use of filters and a naturally occurring effect known as ‘atmospheric extinctionthat reduces the brightness of night-sky objects, will further skew the sensitivity of the sensor to red, green and blue.

    If you were to take equal length exposures for each of your three colour filters your images could end up with a colour cast to them (which is why DSLR cameras have an automatic ‘white balance’ feature built in).

    To compensate for this skewed sensitivity, it is necessary to either take different length exposures for each colour or to adjust an image’s colour balance later in postprocessing.

    The atmosphere naturally scatters blue light more than the other colours so if you can reduce the amount of atmosphere that the blue light has to travel through, your blue data will be crisper and less noisy.

    Aim to capture your blue data when your chosen object is at its highest in the sky.

    Just as important as your image data are your calibration frames. Bias frames are not dependent on the filter in use but your flat frames most certainly are, especially if you are hoping that these frames will remove any ‘dust bunnies’ in your images.

    Although dark frames are not directly dependent on the filter in use, bear in mind that if you have used different exposure lengths for each filter, you will need dark frames of a matching exposure length for each filter too.

    to be continued ...
    امضای ایشان
    برگ در انتهاي زوال مي افتد و ميوه در ابتداي کمال … بنگر که چگونه مي افتي ؟!

  19. 2 کاربر مقابل از stargazer عزیز به خاطر این پست مفید تشکر کرده اند.


  20. Top | #30
    کاربر ممتاز

    عنوان کاربر
    کاربر ممتاز
    تاریخ عضویت
    Feb 2011
    شماره عضویت
    584
    نوشته ها
    1,588
    تشکر
    20,144
    تشکر شده 12,837 بار در 1,573 ارسال

    Astrophotography Complete Guide         
    STEP BY STEP
    Create a spectcular image of The Wall using LRGB captures

    1Luminance

    With the luminance (IR) filter selected, good focus achieved and the autoguider running, start your imaging run. It always pays to capture luminance first so that if the clouds roll in during the session, at least you’ll have something worthwhile for your trouble. Take at least 10, 480s exposures.

    2Red channel

    With the luminance data under your belt you’ll have a pretty good idea of what your image is going to look like even though it will only be in mono, so change the filter to red and carefully re-check the focus, adjusting it if necessary. Take six 240s exposures, binned 2x2.

    3Blue channel

    Assuming that about now, NGC 7000 is high in the sky, change filter to blue and re-check the focus. If you are using an ED doublet refractor there is a good chance the focus will match that of the red filter and with a triplet refractor, it should be bang on. Take six 360s exposures, binned 2x2.

    4Green channel

    The final part of the capture is through thegreen filter. If the cloud rolls in before you capture this set, there is a way of producing a full colour image from what you’ve already captured. Check focus again because if any colour will be out, it’ll be this one. Take six, 300s exposures, binned 2x2.

    5Calibration

    If you have an electro-luminescent panel or light box, capture your flat frames immediately after you’ve taken each set of filtered images, or take them the following day without disturbing the focus. The bias and dark frames can be taken inside at any time. Calibrate each set of filtered images.

    6Stack, align and combine

    Stack the images into four masters, double the size of the red, green and blue masters and align each with the luminance in Photoshop. Produce an RGB file the same size as the luminance and populate each channel with the matching colour. Paste the luminance channel on top and set the blend mode to Luminance.

    to be continued ...
    امضای ایشان
    برگ در انتهاي زوال مي افتد و ميوه در ابتداي کمال … بنگر که چگونه مي افتي ؟!

  21. 3 کاربر مقابل از stargazer عزیز به خاطر این پست مفید تشکر کرده اند.


صفحه 3 از 3 نخستنخست 123

اطلاعات موضوع

کاربرانی که در حال مشاهده این موضوع هستند

در حال حاضر 1 کاربر در حال مشاهده این موضوع است. (0 کاربران و 1 مهمان ها)

موضوعات مشابه

  1. General Observing Guide
    توسط Fowad در انجمن Astronomical discussions
    پاسخ ها: 20
    آخرين نوشته: 03-17-2012, 01:46 PM

کلمات کلیدی این موضوع

مجوز های ارسال و ویرایش

  • شما نمیتوانید موضوع جدیدی ارسال کنید
  • شما امکان ارسال پاسخ را ندارید
  • شما نمیتوانید فایل پیوست کنید.
  • شما نمیتوانید پست های خود را ویرایش کنید
  •  
© تمامی حقوق برای آوا استار محفوظ بوده و هرگونه کپی برداري از محتوای انجمن پيگرد قانونی دارد